Beginners guide to making a Charcuterie Board
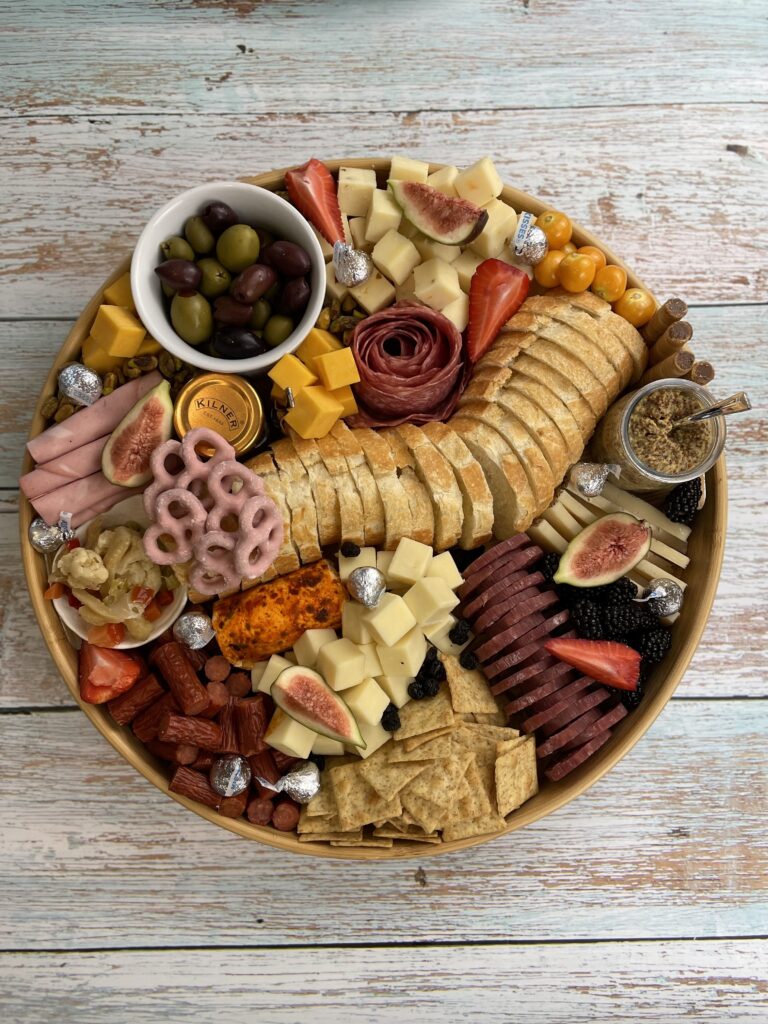
Have you ever wanted to learn how to make a charcuterie board? This culinary trend that’s taken social gatherings by storm – the charcuterie board. This artful arrangement of meats, cheeses, fruits, and more is not just a feast for the stomach, but also for the eyes. Whether you’re hosting a small get-together, a picnic, or simply craving a sophisticated snack, creating your own charcuterie board is a delightful endeavor. Let me show you how to craft the perfect charcuterie board, also known as a grazing board, where flavors and aesthetics harmoniously come together. An impressive Charcuterie Board is the essence of easy entertaining! Piled high with cured meats, cheeses, crackers, fruit, nuts and more, your guests will be wowed by this gorgeous and delicious spread.
Charcuterie Boards are not particularly difficult, but they take time, creativity and expense. With the price of groceries skyrocketing lately it is making these once economical platters a lot less so. Regardless of the expense, they are generally worth it as long as you have the time to shop (the day before preferably), the board and accompanying bowls, containers, cheese knives, spoons that your guests will need to serve themselves.
A charcuterie board for two is perfect for a date night or picnic and a board for a crowd eases the stress and lets you enjoy your guest while they are in your home rather than you being in the kitchen preparing their appetizers or meal.
When you are selecting items for your board, make sure to choose some that will “pop” on your board. Choose bright reds (strawberries, cherries, tomatoes), bright greens (grapes, apple slices, herb garnish), a variety of jams, jellies, mustards and even colored crackers. Cheeses with colorful rinds or colored cheeses themselves are always a great addition to a board.

When placing items on your board, try not to place things that are the same color right next to each other. Separate them with another color or texture to create flow and texture to the board. Texture on the board is just as important as color. Ideally you want to have a variety of textures. You want to have some that are smooth, some that are shiny, some rough, some moist and some dry. I know it sounds complicated but once you start gathering your ingredients you will see what I mean. Dates for example are shiny, apricots are smooth and dry. Triscuit crackers are rough and a fresh baguette is soft and crunchy. Wet items can include the jams or jellies that you choose as well as pickled items like gherkins, onions, olives or peppers. Dry items can be nuts like pistachios, walnuts, pecans or almonds. I always add both fresh and dried fruits for a variety of texture and taste.
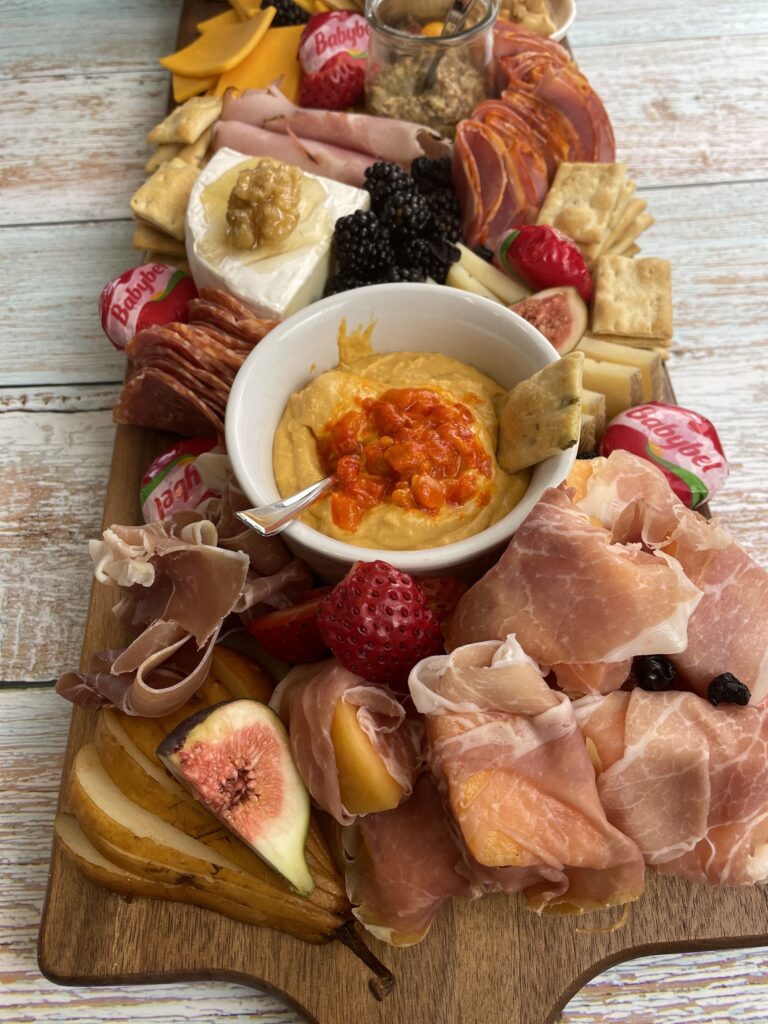
When choosing meats I like a variety of taste, texture and color (yes meats are colored). I also try and vary the presentation of the meats. Prosciutto for example can be piled on the board for your guests to grab and enjoy on a slice of fresh baguette,with a grainy or hot mustard, or it can be wrapped around a piece of melon for a sweet and salty combination OR even wrapped on some lightly blanched asparagus for a more elevated presentation. Salami can be plain, or have a base flavor of wine or even have a parmesan cheese rind. I also like to choose some more common deli meats such as pepperoni (cured or dried) or mortadella for those with a less adventurous palate.

The same goes for cheeses, choose cheeses that provide variety of textures and tastes. A soft or semi-soft cheese, a medium or firm cheese and a hard cheese at the minimum. I like to choose a couple of each for a large board, and I always include a regular cheddar, again for those less adventurous in the crowd. Soft cheeses include burrata, bocconcini, chevere, brie , camembert, or a crumbly cheese such as blue or gorgonzola. Medium sor semi-soft cheeses include havarti, muenster, and pepper jack. Firm cheeses include gruyere, comte, manchego, colby and cheddar. Hard cheeses are just that, ones that require a good cheese knife to break of chunks and they include parmesan, aged gouda and asiago.
When assembling the board I always place my large cheeses first and work around them. Not only does this provide a base map for your charcuterie, but it also provides space between those items that need it. Next add your bowls, ramekins or jars and work from there. When your charcuterie board is full of meats, cheeses and accompaniments, then you can add the additional toppings like nuts, fruit (dried and fresh) to fill in any gaps and then any sweet surprises if you like and finally garnishes like fresh herbs which always provide a nice pop of color and freshness.
You really can’t go wrong, but just throwing everything on a board will likely not produce the effect you are looking for to impress your guests. Take your time and enjoy the process.
This post may contain links to products, as an Amazon Associate, I may earn from qualifying purchases at no extra cost to you.
How to make a charcuterie board:
Step 1: Choose Your Base
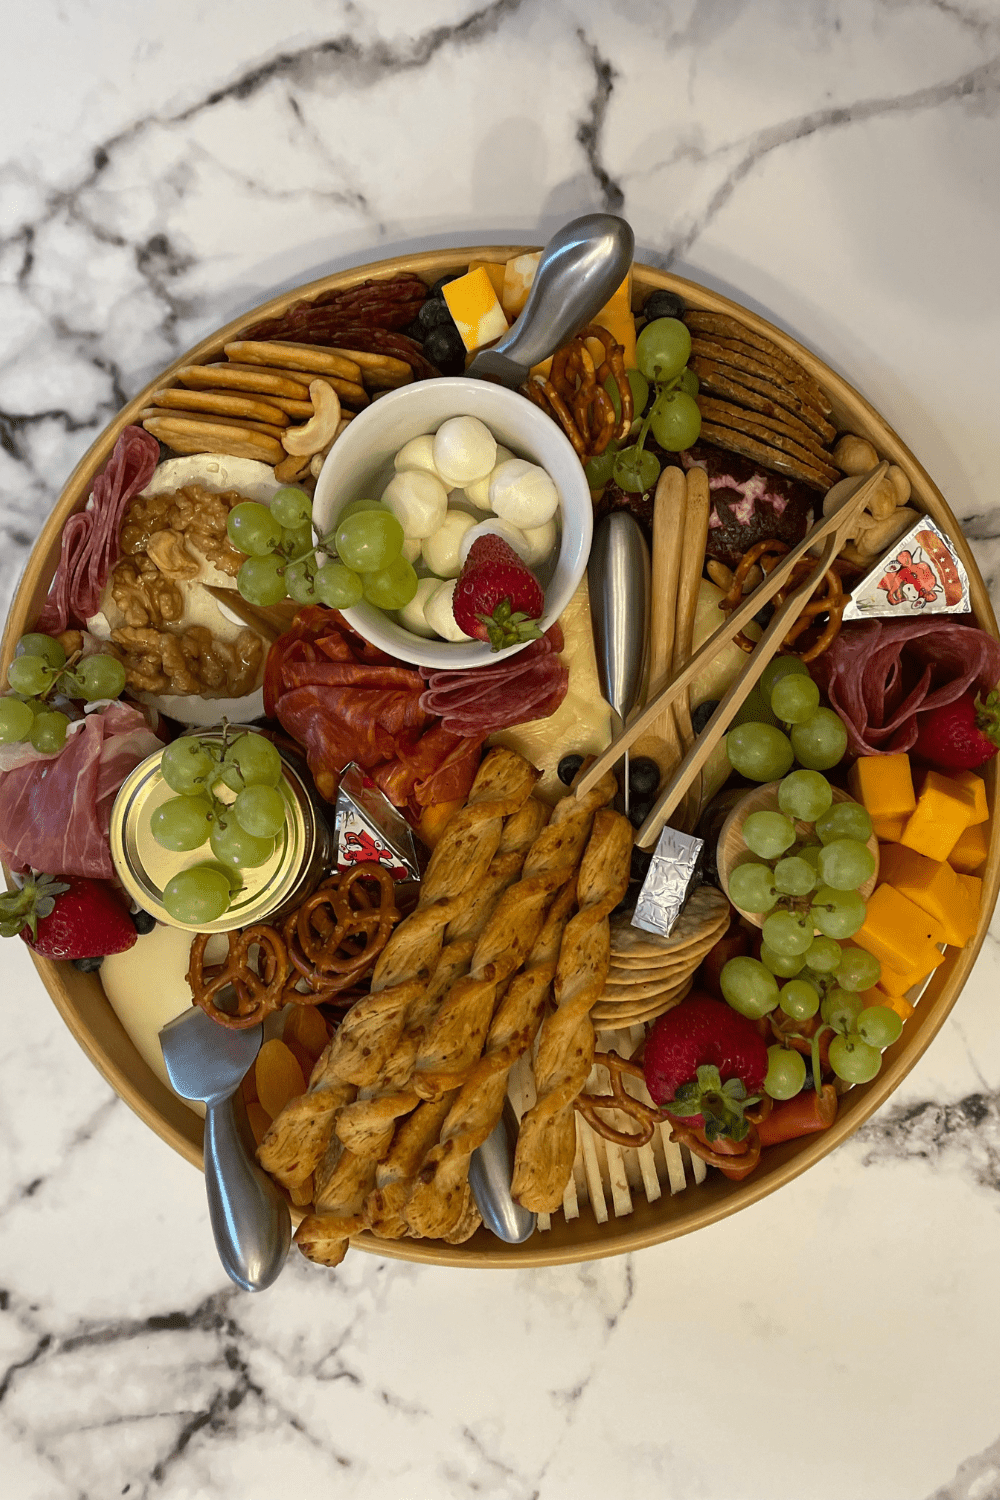
Start by selecting a suitable base for your charcuterie board. A rustic wooden cutting board, a marble slab, or a slate tile can all make excellent options. The base should be large enough to accommodate an array of ingredients while leaving space for arranging them attractively.
If you don’t already have a board you can find some of the ones I like below the first is from Amazon
I love to add cheese markers and knives to larger boards, just in case people are unsure of what cheeses there are on it. Below is a set like the one I have and love.
Step 2: Select Your Cheeses
Variety is key when it comes to cheese selection. Aim for a mix of soft, semi-soft, hard, and blue cheeses to cater to different tastes. Some popular choices include brie, aged cheddar, gouda, and blue cheese. Arrange the cheeses in different corners or sections of the board, making sure to leave enough space between them for other ingredients.
Step 3: Cured Meats
Choose an assortment of cured meats to complement the cheeses. Options like prosciutto, salami, chorizo, and soppressata bring distinct flavors and textures to the board. Fold or roll the meats to create visual interest and to make them easy to grab.
Step 4: Crunchy things
Introduce a range of textures by including a variety of crackers, breadsticks, fresh baguette and crostini. These provide a satisfying crunch and serve as a vessel for your cheeses and spreads. Arrange them alongside the cheeses and meats for easy access.
Step 5: Embrace Sweet and Savory
I always incorporate a touch of sweetness. Fresh fruit like grapes, figs, and berries add vibrant colors and natural sugars. Add some dried fruits as well for a change of texture. Additionally, consider adding small dishes of honey, jam, or chutney or grainy mustard to complement the cheeses and meats. I always include a little bit of chocolate on my boards. Think chocolate dipped strawberries. Fruit and chocolate pair well, so why not?
For a savory kick don’t forget to add some pickled items such as a selection of olives, gherkins, roasted red peppers or pickled onions. They add a punch of flavor variety to the board.
Step 6: Nutty Indulgence
Nuts bring a delightful crunch and richness to the board. Opt for options such as almonds, walnuts, and pistachios. Roasting them with a touch of seasoning can enhance their flavors. Choose your favorite nuts, just make sure they are roasted or flavored (make your own or purchase them). Raw nuts don’t really add much to the board.
Step 7: Include Some Fresh items
Although not traditional, feel free to add fresh vegetables like cucumber slices, cherry tomatoes, and colorful bell pepper strips. These elements add a pop of color and contribute to the overall visual appeal.
Step 8: Arrange with artistic flair
Assemble your charcuterie board with an artistic eye. Start by placing the cheeses in different areas, then weave in the cured meats, crackers, and other accompaniments. Create height and dimension by stacking items or using small ramekins or jars for dips and spreads. Fill any gaps with smaller ingredients like nuts or berries to ensure a polished appearance.
Step 9: Garnish and Greenery
For the finishing touch, add some greenery or herbs. Sprigs of rosemary, thyme, or edible flowers not only enhance the presentation but also infuse the board with a delightful aroma.
Designing a charcuterie board is a culinary journey that allows you to showcase your creativity while offering a delectable array of flavors and textures to your guests. With a well-balanced selection of cheeses, meats, accompaniments, and visual elements, your charcuterie board will be the talk of the event. So, roll up your sleeves, unleash your inner artist, and craft a masterpiece that’s not only delicious but also a feast for the eyes.
Charcuterie Board – How to
Equipment
- 1 Board or box for 8 people you will need a minumum 14" board
- cheese knife set
- cheese markers optional
- small jars or dishes for accompaniments
- small spoons for jams or jellies
Ingredients
- Hard Cheese, such as manchego, parmesan, cheddar, swiss, gruyere, gouda, asiago choose 1
- Semi-Soft cheese, such as havarti, muenster choose 1
- Soft cheese, such as burrata, mascarpone, blue cheese, gorgonzola, cream cheese, goat cheese or chevre, feta choose 1
- Cured Meats like prosciutto, salami, ham, chorizo, capricola, soppressata , mortadella, pepperoni, choose some sweet, some spicy, some plain
- Starches such as a fresh baguette, pita crackers, crostini, whole grain crackers choose a good variety with a minimum of 3
- Savory Accompaniments: such as nuts, pickled items such as gherkins or olives, dips or spreads such as hummus or whole grain mustard choose a variety with a minimum of 3
- Sweet Accompaniments: such as jams or jellies, fresh fruit or berries, dried fruit or berries, chocolate
Instructions
- Choose your board, depending on your party size. A 12-14" board should be sufficient to serve 8-10 people. If you need to you can use multiple boards for larger groups.
- Start with the cheese: start with the cheese to "anchor" the board. Working in odd numbers, so, depending on the size of your party, choose 3, 5, or 7 types of cheeses to place around the board. (I recommend 3 for a board for 8-10). Place the largest cheese just a little off center and work around it for balance. Separate the cheeses so that there is room to add the meats next.
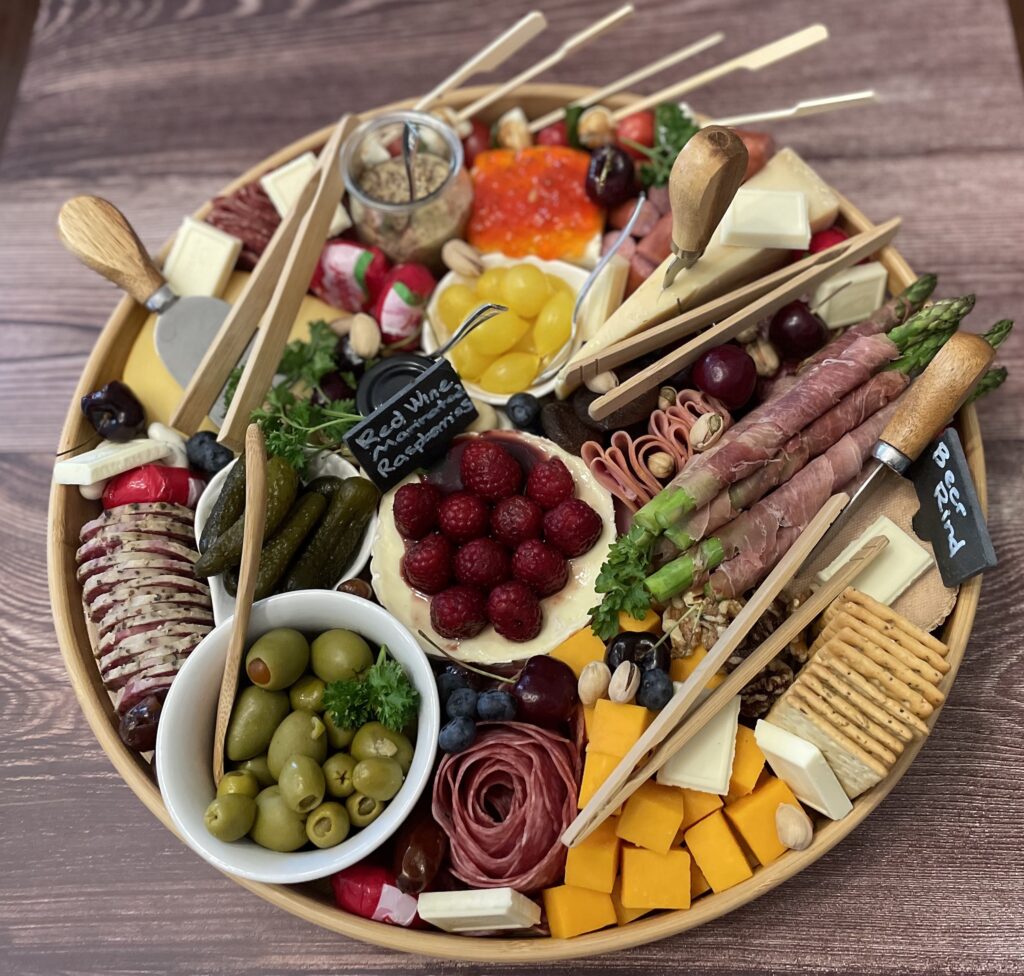
- Fold and add the meats: There are many ways to stack and fold meats. Depending on the thickness of the slice. For thicker meats I suggest a horizontal stack (offset each piece), For medium thickness such as genoa salami either make a meat "rose" or fold into quarters and form a row of meat. For thin meat (like prosciutto) fold them in a light and airy ribbon. Separate your meats around the board. Try to vary texture and colors as you place items.
- Add the Accompaniments: Fill in the gaps with both savory and sweet accompaniments. Try and separate colors in a way that allows the brightest colors to "pop" and place foods together that pair well together. For example, mustard, briny foods and nuts near salami and sopresseta, and sharp cheeses like parmesan. Pair sweet accompaniments like fresh fruit, jams, and candied nuts, near the brie cheese or goat cheese. Cheddar cheese pairs well with savory and sweet. If you want an item to be enjoyed a certain way, then place it on the board in such a manner that it must be eaten that way. For example if you have a wheel of brie and some honey you want to serve with it, pour the honey on top (nuts too if you're using them). If you have a soft cheese you want a particular jelly on, then pour it over. Make sure to set a cheese knife in or next to it so your guests know to use it.
- Look for gaps, fill in with more fruit, nuts or garnishes such as fresh herbs or chocolate treats.
- Refrigerate your board until 30 minutes prior to serving, you don't want it to be too cold especially for the softer cheeses.
- Keep it simple. When starting out, don't buy super expensive cheeses as your guests may prefer the more common varieties. Try one "gourmet" item at a time until you know who likes what.
- Keep colors in mind when you are constructing your board. Try not to have too many items of the same color next to each other.